Esri's ArcGIS platform has become well-entrenched as the primary solution for GIS professionals seeking to implement a scalable integrated solution, which can start with a single user and grow to support multiple users across various platforms. With ArcGIS for Desktop, ArcGIS for Server, ArcGIS Online, and ArcGIS for Mobile, GIS professionals can design and implement a robust GIS solution that provides a wide range of functionality to meet the needs of a growing enterprise, which includes users of various skill levels, requirements, differing platforms, and data formats. However, Esri has not been content to rest on their laurels. They continue to push the GIS envelope. With the release of ArcGIS 10.3, Esri released a new desktop application named ArcGIS Pro.
ArcGIS Pro is a completely new application from Esri. It is not just an update to their venerable ArcGIS for Desktop platform. ArcGIS Pro has a modern ribbon interface that has become common in most current desktop applications. It is also designed from the ground up to take full advantage of modern hyperthreaded 64-bit architecture. This greatly improves its performance compared to ArcMap and ArcCatalog. In this chapter, we will begin to take a look at this new robust and smart interface.
ArcGIS Pro also introduces a new licensing model to Esri users. It makes use of a subscription license, opposed to the standard single use or concurrent use license. Licenses of ArcGIS Pro are tied directly to the annual maintenance of your traditional ArcGIS for Desktop software and managed through ArcGIS Online. You will learn more about this later in the chapter.
ArcGIS Pro allows you to combine 2D and 3D content within a single application. In the past, you would need to utilize multiple applications, such as ArcMap, ArcScene, and ArcGlobe, to view 2D and 3D content. In this chapter, you will examine how you can view both 2D and 3D data within a single ArcGIS Pro project.
In this chapter, you will
Learn the requirements to install ArcGIS Pro
Get a general overview of ArcGIS Pro functionality
Learn how to manage ArcGIS Pro licenses through ArcGIS Online
Understand the relationship between ArcGIS Pro and ArcGIS for Desktop licenses
In order to use ArcGIS Pro, you must first install it. To install ArcGIS Pro, you will need to verify that your system meets or exceeds the minimum requirements, download or have access to the install files, and finally have rights to install the software on the computer you are using. We will look at each of these steps next.
It is possible to install and run ArcGIS Pro on a computer that already has ArcGIS for Desktop installed even if ArcGIS for Desktop is an older version. The two applications may exist side by side.
It can also be installed on a computer that has no other Esri products installed.
As mentioned earlier, ArcGIS Pro is a 64-bit application that supports hyperthreaded processing. This allows ArcGIS Pro to take full advantage of modern processors, such as the Intel i7 and RAM larger than 4 GB. The ability of ArcGIS Pro to make use of this increased computing capability also means the computer you run it on needs to have the power to run ArcGIS Pro.
Compared with ArcGIS for Desktop, ArcGIS Pro has higher minimum computer specifications. This includes increased hardware and operating system requirements.
ArcGIS Pro requires a 64-bit operating system (OS). It will not run on a 32-bit OS. ArcGIS Pro currently supports the following operating systems:
Windows 8.1 Pro and Enterprise
Windows 8.0 Pro and Enterprise
Window 7 Ultimate, Professional, and Enterprise (with SP 1)
Windows Server 2012 R2 Standard and Datacenter
Windows Server 2012 Standard and Datacenter
Windows Server 2008 Standard, Enterprise, and Datacenter (with SP 1)
ArcGIS Pro versions 1.0 and 1.1 are currently not supported on Windows 10, Linux or iOS natively. Esri has said ArcGIS Pro version 1.2 will be supported on Windows 10. They have not indicated whether ArcGIS Pro will support Linux or iOS in the future. It is possible to run ArcGIS Pro on a Linux or iOS computer if you create a virtual windows machine.
ArcGIS Pro has some hefty hardware requirements. It requires modern processors and large amounts of RAM. It also requires a graphics card powerful enough to display 2D and 3D data. To ensure that ArcGIS Pro runs smoothly, you need to make sure that your computer meets or exceeds the requirements shown here:
Hyperthreaded dual core or better processor. 2x hyperthreaded hexa-core processor is optimal such as the Intel Core i7-3930K.
Minimum of 4 GB of RAM with 8 GB of RAM recommended. 16 GB is considered optimal by Esri.
Minimum of 4 GB of hard disk space to install software. 6 GB or higher is recommend.
Graphics card that supports DirectX 9 and OpenGL 2.0 with 512 MB of video RAM minimum. Esri recommends a graphics card that supports DirectX 11 and OpenGL 3.2 with 2 GB of video RAM.
Unlike ArcGIS for Desktop, which has limits on the amount of RAM and processor resources it can use, ArcGIS Pro will use all the resources you can throw at it. So, the more processing power and memory your computer has the better ArcGIS Pro will perform.
ArcGIS Pro is dependent on other applications that must be installed before installation. They provide supporting services which ArcGIS Pro relies on to function. These supporting applications include the following:
Microsoft .NET Framework 4.5
Microsoft Internet Explorer 8 or above
ArcGIS Online or Portal for ArcGIS organizational account
ArcGIS Pro does not require ArcGIS for Desktop in order to be installed on a computer.
I have been working with ArcGIS Pro since it was first released in beta. I have had the opportunity to run it on various computers as it has moved through multiple beta versions to the release of version 1.0 and now 1.1. This firsthand experience, along with my experience running ArcGIS for Desktop since it was first released, has led me to several recommendations when it comes to a system to run ArcGIS Pro.
Based on my experience, I recommend the following specifications when purchasing a computer to run ArcGIS Pro:
Make sure that you have a graphics card with its own dedicated Graphics Processing Unit (GPU). ArcGIS Pro is a graphics-intensive program. Every time you pan, zoom, or add a new layer, you will be taxing the graphics capability of your computer. A dedicated GPU will allow your computer to handle this load by processing graphic rendering requests without burdening your computer's CPU and RAM. If your computer uses integrated video, then the computer's CPU and system RAM are used to handle all processing requests including graphic rendering. ArcGIS Pro is both a processor and graphics-intensive application due to the 2D and 3D maps it creates and the analysis it performs. This can put a tremendous load on your computer's resources. Having the dedicated GPU to handle the graphics rendering load on your computer will greatly improve the performance of ArcGIS Pro and your user experience.
To get a dedicated GPU usually requires your computer to have a separate video card or adaptor. Computers with integrated video typically do not have a dedicated GPU but instead use the CPU to handle the graphics processing. This will slow your computer down. A separate video card also has a dedicated video RAM, which will also enhance your computer's ability to run ArcGIS Pro.
Use a solid state drive. Solid state drives are incredibly fast at accessing and storing data. They are almost as fast as RAM and are much faster than even the fastest hard disk drives. ArcGIS Pro will run at lightning speeds when installed on a solid state drive.
There is no such thing as too much RAM. The more RAM your computer has, the better ArcGIS Pro will perform, especially if you don't have a solid state drive.
If you are going to be doing a lot of analysis or editing and cannot get a solid state drive, try using a raid system to improve performance. Raid systems utilize multiple hard drives to store data. They can be configured in multiple ways. A strip set-based raid, such as RAID 0, RAID 3, or RAID 5, provides the best performance. By storing the data across multiple drives, the computer can access the requested data from each one at the same time. This creates a multilane highway for your data to travel along. A raid system will require at least two hard drives and often a separate controller card.
Run two or more monitors. ArcGIS Pro, like ArcGIS for Desktop, has multiple windows. Being able to display multiple windows at one time will increase your production. It can also allow you to have multiple applications open at one time. While I have not attempted to measure the increased production with ArcGIS Pro, I do know that it increased the production of my team using ArcGIS for Desktop by 10 percent to 15 percent.
All these recommendations can also be applied for those running other applications, such as ArcGIS for Desktop, AutoCAD, MicroStation, Photoshop, and other graphics-intensive applications. I have run all these applications and can say that based on those experiences, any of these recommendations will help them run better.
In order to install ArcGIS Pro, you will need to download the install files from the My Esri website at https://my.esri.com/. Once there you will need to log in using your Esri global account. You will need to make sure that your global account is linked to your organization's Esri customer account in order to do this.
Once you are logged in to My Esri, you will need to click on the My Organizations tab and select the Downloads option, as shown in the following screenshot:

If you are not the administrator for your organizations, Esri account, you might not see the Downloads tab. If this is the case, you will need to request permissions from Esri to view the Downloads tab. To do this, you need to go to My Organizations and then the Overview tab.
Then, you need to click on Request Permissions and fill out the online form, as shown in the following image:

Once you get to the Downloads page, you will need to locate ArcGIS Pro and click on View Downloads. This will take you to the page that allows you to download several files, which you will use to install ArcGIS Pro and supporting applications. You can also check system requirements, see additional products, and select language packs:

The ArcGIS Pro download is the primary install file for the main ArcGIS Pro application. You must download this file if you wish to install ArcGIS Pro. The other two files are optional but recommended.
The ArcGIS Pro Offline Help option will install help files on your local machine, so you can access them without having an internet connection. By default, ArcGIS Pro accesses help information located on the ArcGIS Pro website, http://pro.arcgis.com. This means that you will always see the most current help documentation for the version you are using. You will need to download and install this file if you will be using ArcGIS Pro in a disconnected environment and think you might need to access the Help documentation.
By default, ArcGIS Pro allows you to run Python scripts inside the application without the need to download additional resources. However, if you wish to create scripts that will run outside ArcGIS Pro, that interact with other applications, or can be scheduled to run automatically, you will need to download the Python install files from the My Esri website.
If you cannot access your organization's Esri customer account through the My Esri website, you can request a 60-day trial from the Esri website at http://www.esri.com/software/arcgis/arcgis-for-desktop/free-trial. This free trial includes ArcGIS for Desktop, ArcGIS Extensions, ArcGIS Online, and ArcGIS Pro. Once you activate your trial, you will be sent instructions to download the install files for ArcGIS Pro in addition to other applications included with the trial. These install files are the same ones that are available through the My Esri website linked to your organization.
Now that you have downloaded the install files, you are ready to begin installing ArcGIS Pro. First, you will need to make sure that you have sufficient rights to install new software on your computer. If you do not, you will need to contact your IT department to see if they can provide assistance installing ArcGIS Pro. Then, perform the following steps:
To install ArcGIS Pro, click on the ArcGIS Pro file you downloaded. This will unzip the install files and start the installation process.
Once the install begins, you will first be asked to review and accept the license agreement from Esri. If you wish to install the software, you must accept the license.
Next, you will have to choose who will have access to the application, all users or just the current user. If you want to install such that all users can use ArcGIS Pro, the user installing the software must have full administrative rights.
Then, you will choose the install location. By default, ArcGIS Pro will be installed into
C:\Program Files\ArcGIS\Pro\. It is recommended that you use the default location to avoid issues that could cause problems when running ArcGIS Pro after the installation.Finally, you will be asked if you wish to take part in the Esri User Experience Improvement (EUEI) program. This will send Esri information about system crashes and other use information automatically if you choose to participate.
Once you have run the ArcGIS Pro installation and it is completed, you can install the ArcGIS Pro Offline Help and Python if needed. This installs in a similar manner as the main ArcGIS Pro.
ArcGIS Pro also supports a silent install, which IT staff can use to automate the install of ArcGIS Pro throughout an enterprise. This is done through the use of command line. To conduct a silent install of ArcGIS Pro for all users, use the following command line syntax:
msiexec.exe /i <setup staging location>\ArcGISPro.msi ALLUSERS=1 INSTALLDIR="C:\MyArcGISPro\" /qb
The setup staging location is the location of the install files, which you downloaded and unpackaged. This can be a mapped drive or a Universal Naming Convention (UNC) path. The following are parameter settings, which can be used in the command line.
INSTALLDIR: This parameter is not required. If it is not included in the command line for the silent install, ArcGIS Pro will install to the default location ofC:\Program Files\ArcGIS\Pro\if all users are specified.If a current user is specified it will install to
C:\Users\%UserProfile%\AppData\Local\ArcGIS\Pro.AllUSERS: This parameter determines which users will be able to start and access the ArcGIS Pro application on the installed computer.AllUSERS:1equals all users will have access to ArcGIS ProAllUSERS:2equals current user will have access to ArcGIS Pro
ENABLEEUEI: This parameter controls the user's participation in the EUEI program. Participation in this program will send application usage and crash information to Esri automatically.ENABLEEUEI:0disables participation in the programENABLEEEUEI:1enables participation in the program
qborqrorqn: This parameter controls the display of the UI when the install is being run:qbequals show basic user interface during installqrequals show reduced user interface during installqnequals show no user interface during install
All these parameters are case sensitive.
Unlike ArcGIS for Desktop, ArcGIS Pro does not use traditional single use licenses or rely on a third-party license manager to manage concurrent use licenses. ArcGIS Pro licenses are managed through ArcGIS Online or Portal for ArcGIS.
Your ArcGIS Pro licenses are determined based on the number and level of the ArcGIS for Desktop licenses you or your organization own and have under current maintenance. So, if you have two licenses for ArcGIS for Desktop advanced, four licenses of ArcGIS for Desktop standard and 10 Licenses of ArcGIS for Desktop basic, you will have the same number and level of ArcGIS Pro licenses, which you can assign to users.
ArcGIS Pro has three license levels: basic, standard, and advanced. The functionality of the different license levels for ArcGIS Pro is very similar to that for the equivalent ArcGIS for Desktop license level. The following are a few of the functionality differences between the three license levels:
|
Basic |
Standard |
Advanced | |
|---|---|---|---|
|
Visualize spatial and tabular data |
Yes |
Yes |
Yes |
|
Edit Shapefiles |
Yes |
Yes |
Yes |
|
Edit personal or file geodatabase |
Yes |
Yes |
Yes |
|
Edit workgroup or enterprise geodatabase |
No |
Yes |
Yes |
|
Perform spatial and attribute queries |
Yes |
Yes |
Yes |
|
Create and use geodatabase topology |
No |
Yes |
Yes |
|
Create and use geometric networks |
No |
Yes |
Yes |
|
Create, manage and update relationship classes |
No |
Yes |
Yes |
|
Perform overlay analysis |
Limited to union and intersect |
Limited to union and intersect |
Yes |
|
Perform proximity analysis |
Limited to buffer and multi-ring buffer |
Limited to buffer and multi-ring buffer |
Yes |
To download a complete functionality matrix, go to Esri's product webpage at http://www.esri.com/software/arcgis/arcgis-for-desktop/pricing.
ArcGIS Pro also has extensions like ArcGIS for Desktop. Licenses for these extensions are also matched with the extensions for ArcGIS for Desktop. So, if you have one license of Spatial Analyst extension, you will also have one Spatial Analyst for ArcGIS Pro extension license.
You cannot purchase additional ArcGIS Pro licenses independently. If you wish to have additional licenses, you must purchase new ArcGIS for Desktop licenses at the level you need to provide the functionality required.
ArcGIS Pro uses a subscription licensing model that is tied to your annual ArcGIS for Desktop software maintenance. If you do not stay under a current maintenance agreement with Esri, you will lose access to ArcGIS Pro.
As we mentioned earlier, ArcGIS Pro licenses are managed through ArcGIS Online or Portal for ArcGIS. In order to assign or manage licenses, you must be designated as an administrator. If you are, you can assign ArcGIS Pro and extensions licenses to named users.
To manage or assign licenses you must perform the following steps:
Login to ArcGIS Online (www.argis.com) or Portal for ArcGIS.
Once logged in, you will need to click on Manage Licenses, as shown in the following screenshot:

From the Manage Licenses page, you can then assign ArcGIS Pro and extension licenses to named users within your organization's ArcGIS Online account or Portal for ArcGIS by clicking on the link located under Licensed For:

After clicking on the link, you are taken to a page that allows you to assign the ArcGIS Pro level and extensions to the user. To assign an ArcGIS Pro license to the user, simply click on the radial button next to the level you wish to assign. At a minimum, you will need to have basic in order for ArcGIS Pro to run on your computer:

As you can see in the preceding figure, Tripp Corbin has been assigned an Advanced ArcGIS Pro license along with the Spatial Analyst, 3D Analyst, Network Analyst, Geostatistical Analyst, and Data Reviewer extensions.
If ArcGIS for Desktop is installed on the user's computer, the ArcGIS Pro license level does not have to match the ArcGIS for Desktop license level, the user may be running. These are independent from one another.
As an administrator, you can change the ArcGIS Pro licenses and extensions assigned to users as needed. You can assign licenses as new users are added or revoke licenses as older users are deactivated or removed.
Now that you have installed ArcGIS Pro and have a license, it is time to launch ArcGIS Pro for the first time. You need to ensure that you are connected to the Internet because when you launch ArcGIS Pro, it will need to connect to ArcGIS Online or Portal for ArcGIS to make sure that you have a valid license.
Let's open ArcGIS Pro:
Open ArcGIS Pro. How you do this will depend on your OS and whether you have added shortcuts to your desktop or taskbar.
Once you start ArcGIS Pro, you will need to sign in to your ArcGIS Online or Portal account. This allows ArcGIS Pro to verify your license. You do have the option to allow ArcGIS Pro to remember your login credentials for ArcGIS Online, so you will not have to log in every time you launch ArcGIS Pro.

After ArcGIS Pro verifies your login and license, it will take you to the window that allows you to start a new project or open an existing project. You will now open an existing project.
Before you can proceed further in the book and complete the exercises, you will need to download and install the exercise data. To do this, follow these steps:
Download the exercise data from Packt Publishing. In most cases, this will be downloaded to your
Downloadsfolder unless you specify a different location.Open Windows Explorer or File Explorer depending on which OS you are using. If you are using Windows 7 or 8.1, you will see an icon located on your task bar, which looks like a small file folder in a holder. This will open File Explorer.
Navigate to the location you downloaded the exercise data to. If you downloaded the data to the standard windows default location, you should be able to click on the Downloads option under Favorites in the tree located in the left-hand side of the File Explorer interface.
Double-click on the
LearningArcGISPro.zipfile.
Right-click on the IntroArcGISPro folder. Then, select Copy.
In File Explorer, now navigate to your
C:\ driveoften named Local Disk or OS. TheC:\ drivemay be found under this PC in the tree on the left-hand side of the File Explorer interface.Right-click on the
C:\ driveand select New | Folder.Name the new folder
Student.Right-click on the
Studentfolder you just created and select Paste. This will copy the IntroArcGISPro folder to theStudentfolder you just created.Close File Explorer once the copy is complete.
ArcGIS Pro makes use of projects that can contain 2D and 3D data. You will now open an existing project and begin your first journey into ArcGIS Pro to help verify the successful install of ArcGIS Pro. You will get an opportunity to explore 2D and 3D maps, a layout, and more:
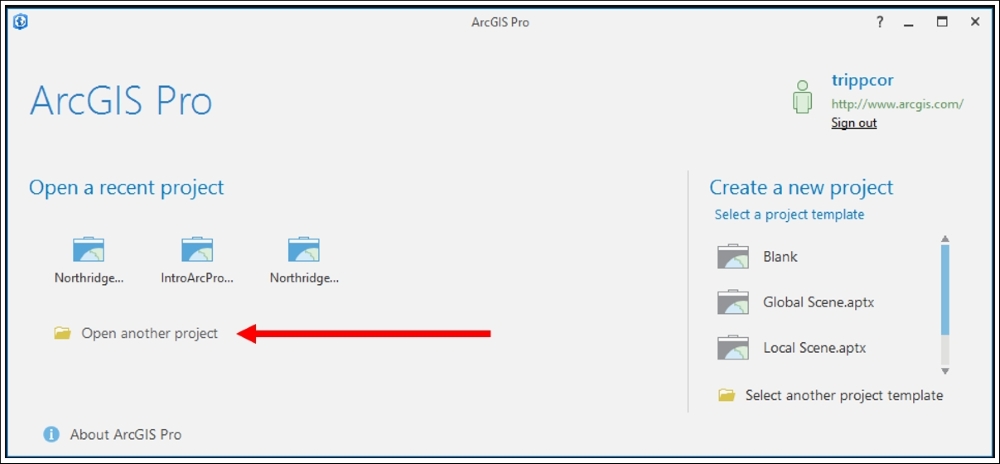
In the ArcGIS Pro Open Project window, click on Open another project option as shown in the following screenshot:
Click on Computer under the Open pane. Then, select Browse under the Computer pane.
Navigate to
C:\Student\IntroArcPro\Chapter1\IntroArcPro_Chapter1or the location you installed the exercise data and selectIntroArcPro_Chapter1.aprx.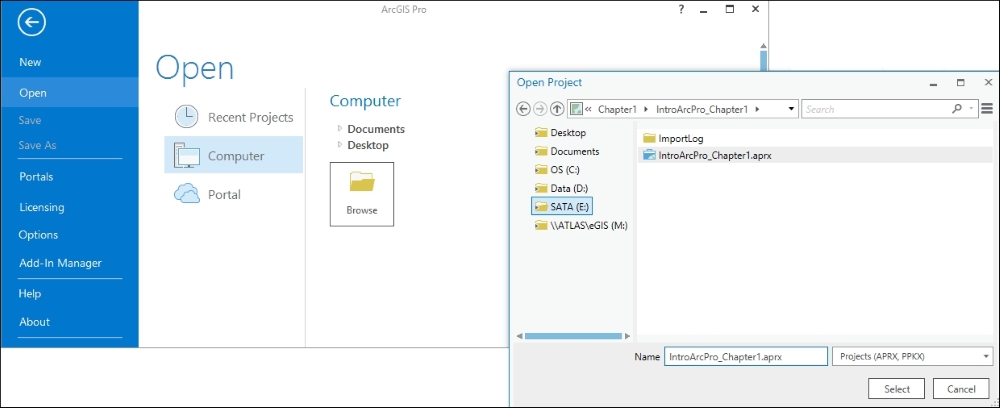
If the project opens successfully, you will see two map views located side by side showing a granite quarry. One is a traditional 2D map, and the other is a 3D map. These two views have been linked together, so when you zoom or pan in one, the other updates to match.

Click on the Explore tool.
Move your mouse pointer to one of the two map views and click your left mouse button and drag it to pan within the view. As you pan in one view, watch what happens in the other view.
Note
Question: What happens when you use the Explore tool within the views?
_________________________________________________________
_________________________________________________________
As you can see, the two views are linked together. This keeps them in sync with one another as you move between them. This is one of the functions you will find in ArcGIS Pro. You do not have to link views, but it can be useful. You will learn how to configure view linking in a later chapter.
Using the Explore tool once again, click on a parcel in either view.
As you have now experienced, the Explore tool not only pans and zooms within the map views but will also retrieve information about the features in the map. Feel free to continue to investigate the ArcGIS Pro project and some of its functionality. When you are finished, close ArcGIS Pro without saving the project.
You successfully installed ArcGIS Pro. This new 64-bit hyperthreaded application from Esri provides an effective tool to visualize a range of data, including 2D and 3D. This increased capability does require a greater amount of system resources to run effectively compared with the earlier ArcGIS applications.
ArcGIS Pro makes uses of a new licensing model. It uses a subscription model as opposed to traditional single user or concurrent licenses. The ArcGIS Pro licenses are tied to the annual maintenance for your traditional ArcGIS for Desktop licenses and are managed through your organization's ArcGIS Online account or Portal for ArcGIS.